
Serendip is an independent site partnering with faculty at multiple colleges and universities around the world. Happy exploring!
Alcoholic Fermentation in Yeast – A Bioengineering Design Challenge
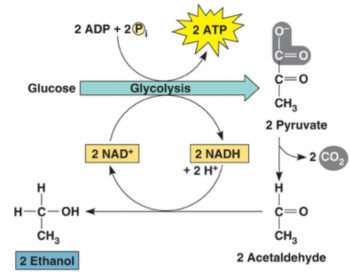
This multi-part minds-on, hands-on activity helps students to understand both alcoholic fermentation and the engineering design process. Students begin by learning about yeast and alcoholic fermentation. To test whether grains of yeast can carry out alcoholic fermentation, students compare CO2 production by grains of yeast in sugar water vs. two controls.
The last part of this activity presents the bioengineering design challenge where students work to find the optimum sucrose concentration and temperature to maximize rapid CO2 production. Structured questions guide the students through the basic engineering steps of specifying the design criteria, applying the relevant scientific background to the design problem, and then developing and systematically testing proposed design solutions.
Download Student Handout: PDF format or Word format
Download Teacher Preparation Notes: PDF format or Word format
The Teacher Preparation Notes provide instructional suggestions and relevant biology information and explain how this activity is aligned with the Next Generation Science Standards.
We invite comments on this hands-on activity, including suggestions for other teachers who are planning to use the activity, useful preparatory or follow-up activities, additional resources or any questions you have related to the activity, or a brief description of any problem you might have encountered. If you have used in your classroom, or if you would prefer to send your comments or questions in a private message, please write Ingrid Waldron at iwaldron@sas.upenn.edu.
Download Minds-On Activities for Teaching Biology
Introduction and Activities Listing

Intro and Biological Molecules
- Characteristics of Life
- Levels of Organization in Biology (NGSS)
- Introduction to Proteins and DNA (NGSS)
- Enzymes Help Us Digest Food (NGSS; hands-on)
- A Scientific Investigation – What types of food contain starch and protein? (NGSS; hands-on)
- Coronaviruses – Introduction (NGSS)
- Who Took Jerell’s iPod? -- An Organic Compound Mystery (hands-on)
- Is Yeast Alive? (hands-on)
- Macromolecules Jeopardy

Cell Structure and Function
- Cell Structure and Function – Major Concepts and Learning Activities
- Cells – How do they carry out the activities of life? (NGSS)
- Why do some plants grow in odd shapes? (NGSS)
- Introduction to Osmosis (NGSS; hands-on)
- Cell Membrane Structure and Function (NGSS; hands-on)
- Cell Vocabulary Review Game

Cellular Respiration and Photosynthesis
- Cellular Respiration and Photosynthesis - Key Concepts and Activities
- How do organisms use energy? (NGSS)
- Using Models to Understand Cellular Respiration (NGSS)
- Using Models to Understand Photosynthesis (NGSS)
- Photosynthesis, Cellular Respiration and Plant Growth (NGSS; hands-on)
- Food, Physical Activity, and Body Weight (NGSS)
- How do muscles get the energy they need for athletic activity? (NGSS)
- Alcoholic Fermentation in Yeast – A Bioengineering Design Challenge (NGSS; hands-on)
- Plant Growth Puzzle (NGSS)
- Where does a tree’s mass come from? (NGSS)
- Photosynthesis Investigation (NGSS; hands-on)

Cell Division
- Mitosis and the Cell Cycle (NGSS; hands-on)
- Mitosis and the Cell Cycle (NGSS)
- Meiosis and Fertilization – Understanding How Genes Are Inherited (NGSS; hands-on)
- Understanding How Genes are Inherited via Meiosis and Fertilization (NGSS)
- Comparing Mitosis and Meiosis
- What causes melanoma and other types of cancer? (NGSS)
- Mistakes in Meiosis – Down Syndrome or Embryo Death (NGSS)
- Mitosis, Meiosis and Fertilization Vocabulary Review Game

Genetics
- Genetics Concepts and Activities (NGSS)
- Genetics (NGSS; hands-on)
- Genetics Intro – Family Members (NGSS)
- Genetics Sickle Cell Anemia and Trait (NGSS)
- Genetics Probability – Sex Ratios (NGSS)
- Mistake in copying DNA & Dwarfism (NGSS)
- Soap Opera Genetics (NGSS)
- Were the babies switched? The Genetics of Blood Types (NGSS; hands-on)
- Dragon Genetics I (hands-on)
- Dragon Genetics II (hands-on)
- Learning about Genetic Disorders
- Genetics Vocabulary Review Game
- Genetics Jeopardy

Molecular Biology
- Molecular Biology: Major Concepts and Learning Activities (NGSS)
- DNA (NGSS; hands-on)
- DNA Function, Structure and Replication (NGSS)
- How Genes Can Cause Disease - Introduction to Transcription and Translation (NGSS; hands-on)
- How Genes Can Cause Disease - Understanding Transcription and Translation (NGSS)
- UV, Mutations and DNA Repair (NGSS; hands-on)
- What types of mutations cause more vs. less severe muscular dystrophy? (NGSS)
- Making Red Blood Cells (NGSS)
- Genetic Engineering Challenge – Preventing Vitamin A Deficiency (NGSS)
- Gene Editing with CRISPR-Cas – Potential Sickle Cell Anemia Cure (NGSS)
- Molecular Biology Vocabulary Review Game

Evolution
- Resources for Teaching and Learning about Evolution
- Evolution by Natural Selection (NGSS; hands-on)
- What is natural selection? (NGSS)
- Natural Selection and the Peppered Moth (NGSS)
- How have mutations and natural selection affected fur color in mice? (NGSS)
- How Whales Evolved (NGSS)
- How Eyes Evolved – Analyzing the Evidence (NGSS)
- How does evolution result in similarities and differences? (NGSS; hands-on)
- What is a species? (NGSS)
- Coronavirus Evolution and the COVID-19 Pandemic (NGSS)
- How Animals Adapt to Their Environments – Examples and Evolution (NGSS)
Ecology
- Ecology Concepts and Learning Activities (NGSS)
- Exponential and Logistic Population Growth Models vs. Complex Reality (NGSS)
- Some Similarities between the Spread of Infectious Disease and Population Growth (NGSS; hands-on)
- Stability and Change in Biological Communities (NGSS)
- Food Webs, Energy Flow, Carbon Cycle and Trophic Pyramids (NGSS)
- Food Webs (NGSS)
- Carbon Cycles and Energy Flow through Ecosystems (NGSS)
- Trophic Pyramids (NGSS)
- Introduction to Global Warming (NGSS)
- Food and Climate Change – How can we feed a growing world population without increasing global warming? (NGSS)
- Coral Bleaching (NGSS)
- Resources for Teaching about Climate Change
- The Ecology of Lyme Disease (NGSS)
Human Physiology and Health
- Negative Feedback, Homeostasis, and Positive Feedback, with Breathing Experiment (NGSS; hands-on)
- Homeostasis, Negative Feedback, and Positive Feedback (NGSS)
- How do food molecules reach our muscles? (NGSS)
- How do we Sense the Flavors of Food? (NGSS; hands-on)
- COVID-19 Vaccines (NGSS)
- Molecular and Evolutionary Biology of HIV/AIDS and Treatment (NGSS)
- Resources for Teaching Cancer Biology
- Carbohydrate Consumption, Athletics, Health – Using Science Process Skills
- Vitamins and Health – Why Experts Disagree
- Regulation of Human Heart Rate (hands-on)
- Should You Drink Sports Drinks? When? Why?
Subscribe
Subscribe to our listserv to receive notices when we post new activities or significant revisions or when we offer an online professional development.
Creative Commons License
This work is licensed under a Creative Commons Attribution-NonCommercial 4.0 International License. To preserve the value of these learning activities for other teachers, please do not post keys for any questions from any of these activities!

Authors
Remote Ready Biology Learning Activities
Remote Ready Biology Learning Activities has 50 remote-ready activities, which work for either your classroom or remote teaching.
What's New? Subscribe to Serendip Studio
A Random Walk
New Topics
-
9 weeks 6 days ago
-
10 weeks 6 hours ago
-
10 weeks 3 days ago
-
10 weeks 3 days ago
-
10 weeks 3 days ago

Comments
2023 revision
We have revised the Student Handout to improve the logical flow, clarify many of the questions, and provide a more informative and thought-provoking analysis of the results of the bioengineering design challenge. We have added a shorter version of the Student Handout for teachers who will not include the bioengineering design challenge. We have also revised and updated the Teacher Preparation Notes, which now includes an alternative version of the Student Handout pages for the bioengineering design challenge.
Ingrid
Modified for Test Tubes in a Large Beaker Bath
When I ran this lab 3/12 I decided it made the most sense for me to have each group of 4 use a hot plate with a 1000 mL beaker filled with the warm water for their source of water and for the bath and test tubes (50 mL) for the "cups."
This worked well for a number of reasons:
1. The original directions weren't clear on how big the "cup" should be so that the bubbles don't run over.
2. I have a lot of test tubes, so it worked well to have a lot to pass out.
3. The test tubes can be placed in the large beaker without falling over and up to and passed the liquid line will be fully submerged in the warm water, giving a consistent temp.
4. The hot plates provide a way to keep the water temp where you want it for the whole class period and for the next periods as well.
In order for this switch, to test tubes, to work I needed to cut the amounts of water, yeast, and sugar. I switched to 20 mL water, 1.0 g Yeast, and 0.2 g sugar. This seemed to work very well. The 20 mL of water filled up the tests tubes a little less than half way, providing enough room for the yeast to bubble if it is going to.
I also had my group use plastic weigh dishes instead of paper because they are reusable and I don't have much paper in my room.
Thanks for this lab! I'll be trying out the second part, the baker's challenge next.
Thank you!
I very much appreciate your helpful, detailed suggestions of an alternative way to carry out this lab. Your suggestions should be very useful for teachers who have test tubes and hotplates. For teachers who want to use the method described in the Student Handout, the size of the clear plastic cups should be 10 ounces.
Thank you for your helpful comment,
Ingrid
2018 revision
The first two pages of the Student Handout have been revised to promote student interest. Additional changes have increased clarity in both the Student Handout and Teacher Preparation Notes.
Ingrid
Bio-Energetic Unit
Thank-You SO MUCH for your Outstanding Resources!!!
I have just made the transition from middle school to high school in CA and
am trying to implement the NGSS standards in pretty challenging conditions.
I SO APPRECIATE the thought & effort behind your activities--They are Amazing
and you should be Proud! Thanks Again, Grateful HS Bio Teacher
Thank you!
Thanks for letting me know that our activities have been useful for your teaching. I very much appreciate this kind of encouraging feedback, which helps to keep me motivated to continue to improve our activities.
Ingrid
water bath
I am uncertain as to whether or not I should be using a temperature stabilized water bath. Am I putting the solution in a cup and putting the cup in water that is at the experimental temperature and then see what changes occur as the fermentation proceeds, or in a bath that keeps the water at a certain temperature?
Thanks for the help!
Water Bath
If you have a water bath that can maintain a stable temperature, that would be ideal. The instructions are written for people who do not have a temperature-regulated water bath and will use something like water in a dishpan, which is adequate but not ideal.
Ingrid
Helpful advice from a fellow teacher
A teacher has posted helpful advice which I fear you may not see since his/her comment is at the bottom of this comment page. Here it is:
I just completed part II of this lab with my freshmen biology students. I recommend proofing the yeast a few days before working the experiment with students. You need to heat up warm water (35 C) and add a little sugar and yeast. Use the same proportions as listed in the procedures. If you see a significant amount of foam produced, the yeast is alive and will likely perform for your experiment.
Sometimes the yeast we buy is dead - that's why the author suggests using newer yeast.
Also I found it helpful to spend some time the day before the experiment explaining the procedure to my students. Even then it has a lot of moving parts and kids who daydream get very confused about what they are supposed to be doing. Just a FYI.
We welcome your comments and thank those of you who have contributed,
Ingrid
2016 revision
We have streamlined and clarified the introduction to alcoholic fermentation and the initial experiment. We urge teachers to read the Teacher Preparation Notes, which include the description of the biology of alcoholic fermentation in yeast (page 6) and an alternative version for part of the Student Handout (for teachers who are not planning to do the Bioengineering Design Challenge; see pages 2-3 and 12).
Second Revision in 2015
The Student Handout has been revised to clarify the questions and improve the logical flow. The instructional suggestions in the Teacher Preparation Notes have been clarified.
2015 revision
This revised activity is aligned with the Next Generation Science Standards (see page 1 of the Teacher Preparation Notes). A major change has been the inclusion of a bioengineering design challenge where students work to find the optimum sucrose concentration and temperature to maximize rapid CO2 production, using no more sucrose than needed for maximum CO2 production. Structured questions guide the students through the basic engineering steps of applying the relevant scientific background, developing and systematically testing proposed design solutions, and then using their initial results to develop and test improved design solutions. Also, we have improved the scientific accuracy of the discussion of yeast metabolism.
how can i measure the depth
how can i measure the depth of the bubbles
Measuring the Depth of the Bubble Layer
The bubbles form a discrete layer on top of the solution of sucrose and yeast. To measure the depth of the bubbles, you just measure the height of the layer of bubbles using a ruler.
Ingrid
Optimal Sucrose concentration
I apologize if this answer is found somewhere in the teacher prep material, I have not found it. When preforming this experiment I expected to see an increase in the carbon dioxide production as the sucrose concentration increased. For example, the 10% sucrose would result in the most carbon dioxide production. Instead, several lab groups saw the most carbon dioxide production with the 1% solution. Is this due to experimental error or is this the expected result? I am curious if too much sugar is detrimental to the yeast.
Relationship of sucrose concentration to CO2 production
We would expect to see an increase in CO2 production as sucrose concentration increased, at least up to 10% sucrose. There is some evidence that very high concentrations of sucrose can result in decreased CO2 production, perhaps due to osmotic effects resulting in dehydration of the yeast cells. However, we would not expect to observe this effect in the range of 1-10% sucrose concentrations. As you suggest, there may have been experimental error such as differences in temperature that produced the anomalous results.
the lab
Why did the bubbles happen? why did they come up from the yeast?
bubbles due to carbon dioxide production
The bubbles are due to the carbon dioxide produced by anaerobic fermentation (see the next to the last section of the Teacher Preparation Notes).
October, 2011 Revision
The Teacher Preparation Notes have an improved section of Instructional Suggestions. The revised instructions on the top of page 3 of the Student Handout will help to ensure student success with the experiment.
May, 2011 revision
This activity has been revised to clarify and streamline the first experiment and the discussion of aerobic cellular respiration and alcoholic fermentation.
December 2010 update
The main change is an updated, reorganized description of aerobic cellular respiration and alcoholic fermentation.
Effect of salt, egg and flavoring agent (i.e. raisin) in bread
What is effect of adding salt, egg or raisin in fluffiness of bread?
Hi, We don't know the answer
Hi,
We don't know the answer to this question. The baking site we have provided in the prep notes (http://busycooks.about.com/od/bakingscience/a/yeastbreadingredients.htm) says salt and fat cause bread not too rise as much. My own experience in performing the lab is that salt (and cinnamon) slows down the rate of cellular respiration in baker's yeast.
This sounds like it could be a good investigation for your students.
I hope this helps!
Jennifer
Answer Key
Dear Mrs. Ingrid.
Is it possible that you have the answers to the questions for this lab?
Answers for Questions
We do not have teacher answer keys for our activities. However, most of the questions for this activity can be answered based on information presented in the Student Handout and Teacher Preparation Notes or general knowledge of principles of experimental design (which are particularly important for this activity since it is an inquiry activity in which students design their own experiments). If you would like more background concerning the biological processes discussed, we recommend that you read relevant sections in a good college-level introductory biology textbook or a biology textbook for a high school AP course, e.g. Campbell, Reece, et al., Biology, eighth edition (Pearson/Benjamin Cummings). If you have a specific question or two that you are uncertain about, please let me know.
Ingrid Waldron, Ph.D.
Respiration Lab
We did this lab on a Friday and left it for the weekend.
We got foaming and some gas produced after 20 minutes. By the end of the day the 10% and 5% solutions had produced enough gas to measure but the students never saw it.
By Monday morning the gas was all gone due to the fact that the building is not heated on the weekends.
I suggest doing the lab on a weekday and looking at results after 24 hours.
We also added BTB solution to each one for a color change which showed the production of carbon dioxide gas.
Getting results within one class period
It should be possible to complete Part I of this activity in one class period. To ensure that your students can observe results at 10 and 20 minutes, be sure to use rapid rise or fast acting yeast that is not near or past its expiration date and water that is between 80°F and 115°F.
What was the grade level of
What was the grade level of the students who completed this lab? Do you think middle schoolers (7th & 8th graders) would be able to complete this lab? Any guidance about aspects of the lab with which students struggled?
suggestion for middle school students
We have used Cellular Respiration in Yeast with high school students, typically ninth graders. For seventh and eighth graders we recommend Is Yeast Alive? (/sci_edu/waldron/#yeast). This activity provides a simpler approach to yeast metabolism which is more appropriate for most middle school students. You could use pages 1-3 of the student handout for Is Yeast Alive? and omit the part on growth of yeast if you want to focus just on metabolism.
Ingrid Waldron
Yeast & Celluar Resp.
Just a comment about the yeast used. I used baker's yeast which claims to be Saccharomyces cerevisiae.
This yeast did nothing after 10 minutes, 20 minutes, after 30 min there was some action. This is not useful for a 90 minute period as there is no visible buildup of CO2 and 'measure the bubbles' means nothing if there aren't any, or they are not in the same area (after overnight they were distributed throughout the tube).
Just wondering what I did wrong? I used water heated to 38degC and the 0%,1%,5%,10% solutions. However nothing happened....is there something wrong with my yeast? Does it go off? Should I not be using baker's yeast?
As an addendum, I wanted to view the comments for this activity to see if someone had already answered this question but only this form came up, no prior comments area. Maybe it would be easier if I could just see the comments and then I might be able to work this out without posting!
Thanks for the lab, I think it's good but I couldn't get it working.....any advice?
Jason
advice to ensure that your yeast will grow
We are sorry you had problems getting the yeast respiration lab to work in your classroom. Simply mixing yeast, sugar, and warm water (80-115 F) into a homogeneous solution will cause the yeast to start respiring. If yeast do not respire (release gas and make bubbles) when mixed with warm water and sugar there is either something wrong with the 1) yeast or 2) water.
Problems with the yeast could be that it is too old or was exposed to extreme heat or cold. Problems with water could be that it was too cold (below 80 F) or too hot (above 120 F) or has too many impurities (this would be very rare and would probably only be the reason if you used non-potable water). If you start with water that is too hot and it cools to warm water, the yeast may still have been killed while the water was too hot.
The speed at which the yeast respire will depend on how fast the warm water cools off in your classroom (how warm or cold your classroom is), however as your yeast mixtures didn't produce any bubbles I suspect that was something off with your yeast or water.
Proofing the yeast
I just completed part II of this lab with my freshmen biology students. I recommend proofing the yeast a few days before working the experiment with students. You need to heat up warm water (35 C) and add a little sugar and yeast. Use the same proportions as listed in the procedures. If you see a significant amount of foam produced, the yeast is alive and will likely perform for your experiment.
Sometimes the yeast we buy is dead - that's why the author suggests using newer yeast.
Also I found it helpful to spend some time the day before the experiment explaining the procedure to my students. Even then it has a lot of moving parts and kids who daydream get very confused about what they are supposed to be doing. Just a FYI.
Thank you
Thank you for your helpful comments and suggestions.
Ingrid
Post new comment