
Serendip is an independent site partnering with faculty at multiple colleges and universities around the world. Happy exploring!
Creating Your Own Collections: HippoCampus

The wealth of available educational resources can be overwhelming and difficult to navigate. Sites which currate these resources all have some built-in mechanism for sorting -- by subject matter, level of difficulty, source, etc. However, these pre-packaged collections are no replacement for currating your own prefered resources and materials into sets that correspond to your interests and courses. This series of posts will provide tutorials on how to create your own collections from sites which offer currated resource lists. Collections in HippoCampus are called "Playlists," which reflects the extremely multi-media focus of HippoCampus's materials.
Creating a collection of resources on HippoCampus, as on most sites, requires you to create an account. Because HippoCampus is, in part, targeting individual learners, the sign-up process is quick and not very demanding. As soon as your account is saved, you’re ready to start creating a collection, which HippoCampus refers to as a “Playlist.” Once you create an account, you will find yourself as your own HippoCampus homepage. This page doesn’t look much different from the public homepage, though it does provide you with a link you can use to link directly to your account page from, for example, a course page. For our test playlist, we will make a playlist for an introductory level creative writing class.
First, we need to select “English” from the “Browse Subjects” tabs. Note that on HippoCampus you cannot search directly for a topic by name, or create a playlist with nothing assigned to it from the home page. While you can start out by browsing by collections, there is little incentive to do so given that resources within a topic are broken down by collection regardless.

After we select English as our topics, we will see a list of material types and sources. English looks somewhat sparse, but bear in mind that the math and science resources are much better populated. The instructions on this screen tell us to “Select an item from the left column to display a list of Topics.” At the top of the topic list, you will now see a section titled “Playlists” which didn’t appear when we weren’t logged in.

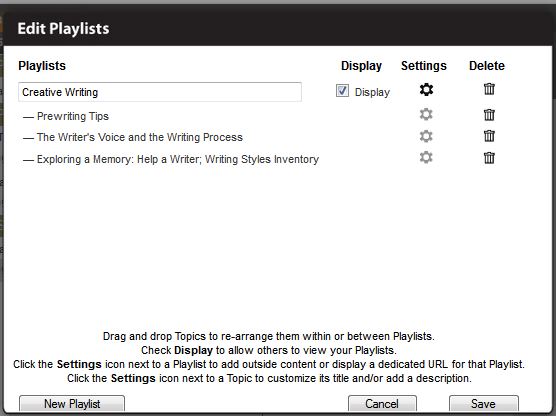
From this window, select “New” in the Playlist section and the “Edit Playlists” window will appear.

From here, we can name our playlist, enter its description, and retrieve a URL which links straight to the playlist. We’ll name this playlist “Creative Writing” and enter a short description.

Click “save” and your playlist will appear in the column with the other content. The number in parenthesis displayed next to the title shows how many resources have been added. In this case, what we have displayed right now is “Creative Writing (0)” with an arrow icon. Clicking on the icon takes you to a page dedicated to the playlist itself, but for the moment that page is completely blank except for the descriptive information we just entered. Instead, let’s start adding some content. We’ll start by selecting a source, SIATech Collection, and then the subtopic “English Language Arts.” This brings up a list of materials organized into the more specific headings. To begin, we’ll select “Prewriting Tips” under the topic “Fundamentals,” since that sounds like a good place for any writer to begin.
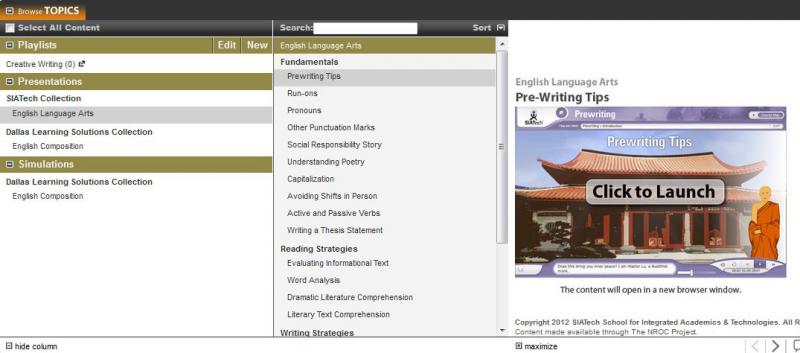
Adding the content to our playlist is easy; we simply drag and drop the topic title over to our playlist. You will see that a “(1)” has now appeared next to the playlist title. Let’s add a few more resources to our playlist, this time from the “English Composition” section under “Dallas Learning Solutions Collection.” We’ll add “The Writer’s Voice and the Writing Process” From Presentations and “Exploring a Memory” from the Simulations section. This brings our total number of resources in the playlist to three. When we select “Edit,” we can see all of the resources we’ve included. From this screen, we also have the options to rearrange or delete the items we’ve added.
Now let’s try opening the page dedicated to our Playlist by clicking on the arrow icon.

From this screen, we can “play through” our Playlist and see the details of each individual item. The details show users where each item came from. For example, if a student finds the Dallas Simulation to be particularly helpful, she’ll k now exactly where it came from – and where on HippoCampus to find more resources like it. You can view the Playlist we just created by following the “dedicated link” provided on the settings page. At the top and bottom far right, there are buttons for social media integration and commenting. The options allow you to tweet the items or playlist and like them on Facebook. You can also post comments and questions on the materials, and link back to the items.
Blended Learning Menu
What are you looking for?
Blended Learning Resources by Subject
Remote Ready Biology Learning Activities

Remote Ready Biology Learning Activities has 50 remote-ready activities, which work for either your classroom or remote teaching.
Recent Group Comments
-
thank youSerendip Visitor (guest)
-
Bryn Mawr College 2015 Blended Learning ConferenceNina Dowlin (guest)
-
web "events" and "syllaships"Anne Dalke
Recent Group Posts
New Topics
-
2 weeks 6 days ago
-
2 weeks 6 days ago
-
7 weeks 1 day ago
-
7 weeks 4 days ago
-
7 weeks 6 days ago
